Creating a new project
Creating a project using the vanilla boilerplate as boilerplate is a very simple process as illustrated in the image below and detailed in the following sections.

Cloning the vanilla boilerplate repository
To create a new Cubbles project, you should clone or download the 'vanilla boilerplate' from its repository, which is an npm based package that uses webpack as bundler tool. We will create a project called 'my-first-ct-project'. The following code will clone the repository in a folder called as our desired repository:
git clone https://github.com/cubblesmasters/vanilla.git my-first-ct-project
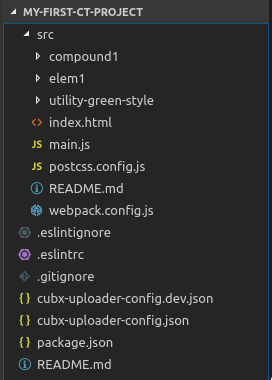
After that, you should have a folder structure like the one below:

Change the origin
Run the following commands to change the origin of the package to your own package:
$ git remote rm origin
$ git remote add origin git@github.com:<your-git>/<your-package-name>.git
$ git config master.remote origin
$ git config master.merge refs/heads/master
Initializing your package
Now, you need to initialize your package using the npm init command.
Remember that the name of the package will be used to generate the
webpackageIdof your webpackage. Which in the sample case would bemy-first-ct-project.
Running 'npm install'
As usual, you should run the npm install command to install all the required dependencies of your package. If everything goes well, you will be able to use the available scripts to develop, build, validate and upload your webpackage.
Boilerplate content
The 'src' folder
In the root of the project, you can find a 'src' folder that contains the source code of the developed artifacts. Also, this folder contains the config files required by webpack to build a distribution version that follows the structure of a Cubbles webpackage.
The vanilla boilerplate includes three folders containing sample artifacts:
- elem1: this folder contains an elementary component sample, which includes:
- The element.html file: it contains the view of the sample elementary.
- The element.js file: it contains the logic of the sample elementary.
- The element.sss file: it contains the style of the sample elementary.
- The MANIFEST.elementary.js: it contains only the manifest definition of the sample elementary. As you may notice, it is a javascript script; thus, you have more freedom to play with the definition, but at the end, it should be Cubbles manifest valid.
- The SHOWROOM.html file: it contains a demo of the component.
- The webpack.subconfig.js file: it contains a base webpack config for elementary components.
- compound1: this folder contains a compound component sample, which includes the same files of elem1 folder. But, in this case, element.js file only imports the style of the compound. Remember that, compound components have no associated logic.
- utility-green-style: this folder contains a utility sample. The c-util.js and c-util.sss are just sample code; in a real case, those should be the files of a library or utility that you want to use.
The MANIFEST definition of each artifact in the 'src' folder will be joint to produce a single valid Cubbles webpackage manifest. The final manifest will be bundled by webpack in a 'dist' folder after building the project.
The 'package.json' file
This is a common npm package definition file. It contains the required dependencies to develop, build, validate and upload Cubbles artifacts. Those tasks can be carried out running the scripts listed in the file using ntl or simply running the command 'npm run [script-name]'.
The cubbles property
In the package.json file, you can provide Cubbles related information for your webpackage. To aim that, you should assign a property called "cubbles", which is an object with the following properties:
| Property | Type | Description | Sample |
|---|---|---|---|
| coder-toolset | object | A property to set coder-toolset related information. By the moment, it only has one property: cubx-webpackage-uploader, which allows providing upload configuration as explained below. | { cubx-webpackage-uploader: { dev: { source": "test/testdata/packages/package1", target": { url: "http://localhost:5984/sandbox", path: "_api/upload", proxy: "http://proxy.de:80" }, debug: true } } |
| modelVersion | string | modelVersion of your webpackage. Version of the webpackage specification. See this for more info. | "10.1.0" |
| groupId | string | Th groupId of your webpackage. Use this to define/select a namespace for the webpackage (e.g. org.example). See this for more info. | "org.example" |
| runnables | array | Runnables of your webpackage. Resources that are actually runnable in a users webbrowser. See this for more info. | [ { "name": "readme", "path": "/doc/readme.html", "description": "Read this ..." } ] |
| man | string|array | 1..n urls to external manual(s) related to your webpackage. See this | [ "http://project.com/man", "http://project.com/man2" ] |
Upload config object
The configuration object has the following properties:
url [mandatory, string/url]: This is the url of the Cubbles Base where the webpackage will be uploaded to.proxy [optional, string/url]: If your connection to the Cubbles Base is routed over a proxy server, use this attribute to provide the proxy url.dryRun [optional, boolean]: This option allows you to run the task, without actually uploading anything.debug [optional, boolean]: Set the debug option to "true" to print more details.
Other config files
Also, the root folder contains common config files such as .gitignore and .eslintrc.
