The Cubbles mutation based start event API
Purpose
Cubbles allows users to observe the mutations of an HTML node (See this) and then dispatch an event if a mutation occurs. The mutations that can be observed are the ones corresponding to {childList: true}.
The RTE contains a utility called mutation-based-cubx-startevent which contains the following attributes:
- data-cubx-target-selector: to provide a css selector to indicate which node should be observed
- data-cubx-emit-event: to indicate the name of the event, which should be dispatched when a mutation occurs.
It is important to highlight that the only mutation to be observed is the first one that occurs; after that, the event will be dispatched and the observer will be disconnected.
The following sections present a demo to show the proper use of the mutation-based-cubx-startevent utility.
Prerequisites
- We will use the cubx-textarea component in our example. Thus, it should be available within the store you are currently using
Sample case
Let's say say you are building an app where a Cubbles component will be included. The component will be appended to a div container, but you need the Cubbles RTE to start working after this div suffers a mutation. Thus, you need to use the mutation-based-cubx-startevent.
Using the mutation-based-cubx-startevent utility
To use the mutation-based-cubx-startevent first we need to:
- Include it as script within the head of our HTML document
- Add a root dependency to include the
cubx-textareain our page - Include the
custom-elements-es5-adapter,webcomponents-liteand thecrc-loaderscripts as usual. - Provide a value for the
data-cubx-starteventwithin thecrc-loaderscript since we want the Cubbles RTE to start working after a mutation occurs
Lets say we want to observe a div, whose id is observable. Also, we want an event called mutationBasedStart to be dispatched when the mutation occurs. Therefore, the values of the mutation-based-cubx-startevent attributes should be:
| Attribute | Value |
|---|---|
| data-cubx-target-selector | #observable |
| data-cubx-emit-event | mutationBasedStart |
The head element
Using the information presented above, the head element of our app should look similar to the one shown below:
<head>
<meta charset="UTF-8">
<title><cubx-textarea></title>
<link rel="stylesheet" type="text/css" href="style.css">
<script src="https://cubbles.world/sandbox/cubx.core.rte@3.0.0-SNAPSHOT/webcomponents/custom-elements-es5-adapter.js"></script>
<script src="https://cubbles.world/sandbox/cubx.core.rte@3.0.0-SNAPSHOT/webcomponents/webcomponents-lite.js"></script>
<script src="https://cubbles.world/sandbox/cubx.core.rte@3.0.0-SNAPSHOT/mutation-based-cubx-startevent/js/mutationBasedCubxStartevent.js"
data-cubx-target-selector="#observable"
data-cubx-emit-event="mutationBasedStart"></script>
<script>
window.cubx = {
CRCInit: {
rootDependencies: [
{
webpackageId: 'com.incowia.basic-html-components@2.0.0-SNAPSHOT',
artifactId: 'cubx-textarea'
}
]
}
};
</script>
<script src="https://cubbles.world/sandbox/cubx.core.rte@3.0.0-SNAPSHOT/crc-loader/js/main.js" data-crcinit-loadcif="true" data-cubx-startevent="mutationBasedStart"></script>
</head>
The body element
As you can already imagine, the body of our app should have a div container with an id equals to observable. That will be enough, however we want our app to explain how our mutation-based-cubx-startevent works, so we will also include the following elements:
- A title for our app
- A description of the values of the NaN attributes
- A description explaining how the
mutation-based-cubx-starteventworks in this particular case - A button to append the component called
cubx-textarea - And a loader to be shown while the Cubbles RTE is working
The code of the body of our app should now look as follows:
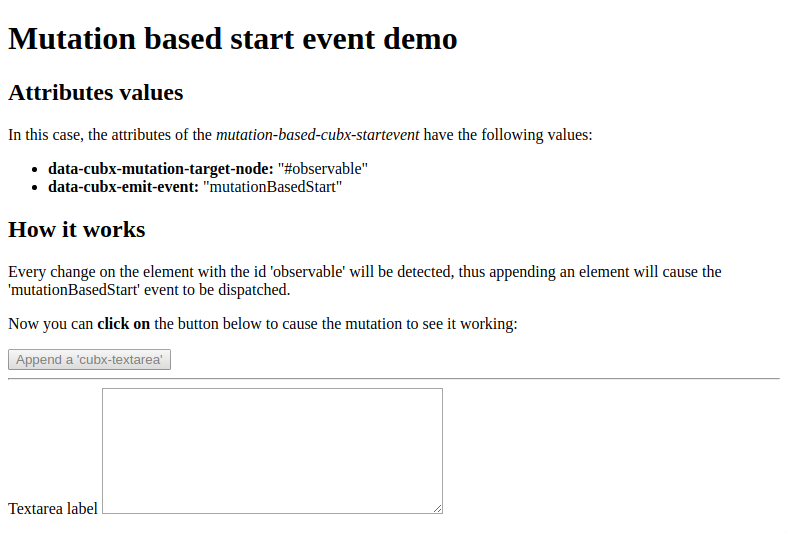
<h1>Mutation based start event demo</h1>

<h2>Attributes values</h2>
<p>In this case, the attributes of the <em>mutation-based-cubx-startevent</em> have the following values:</p>
<ul>
    <li><strong>data-cubx-mutation-target-node:</strong> "#observable"</li>
    <li><strong>data-cubx-emit-event:</strong> "mutationBasedStart"</li>
</ul>

<h2>How it works</h2>
<p>
Every change on the element with the id 'observable' will be detected, thus appending an
element will cause the 'mutationBasedStart' event to be dispatched.
</p>
<p>
Now you can <strong>click on</strong> the button below to cause the mutation to see it working:
</p>
<button id="appendComp">Append a 'cubx-textarea'</button>
<hr>
<div class="loader"></div>
<div id="observable"></div>
A script to control behavior
We need a script to:
- Create and init the
cubx-textareacomponent using the The Cubbles Tag API. - Append the
cubx-textareacomponent to the observable div after the appendComp button is clicked. - Show the loader while the Cubbles RTE is working
- Hide the loader and show the observable when the component is ready
Our code should look similar to the one shown below:
<script>
(function () {
        'use strict';
        var loader = document.querySelector('.loader');
        var appendComp = document.querySelector('#appendComp');
        var observable = document.querySelector('#observable');

        // Append the cubx-textarea component to the observable div after the appendComp button is clicked.
        appendComp.addEventListener('click', function () {
            observable.appendChild(createTextareaComponent());
            appendComp.setAttribute('disabled', 'disabled');
            loader.style.display = 'block';
        });

        // Hide the loader and show the observable when the component is ready
        document.addEventListener('cifReady', function () {
            loader.style.display = 'none';
            observable.style.display = 'block';
        });

        // Function to Create the cubx-textarea component using the The Cubbles Tag API.
        function createTextareaComponent() {
            var init = document.createElement('cubx-core-init');
            init.style.display = 'none';
            init.appendChild(createSlotInit('label', '"Textarea label"'));
            init.appendChild(createSlotInit('cols', '40'));
            init.appendChild(createSlotInit('rows', '8'));
            var testTextarea = document.createElement('cubx-textarea');
            testTextarea.setAttribute('cubx-webpackage-id', 'com.incowia.basic-html-components@2.0.0-SNAPSHOT');
            testTextarea.appendChild(init);
            return testTextarea;
        }

        // Function to create a cubx-core-slot-init using the The Cubbles Tag API.
        function createSlotInit(slotName, slotValue) {
            var slotInit = document.createElement('cubx-core-slot-init');
            slotInit.setAttribute('slot', slotName);
            slotInit.innerHTML = slotValue;
            return slotInit;
        }
})()
</script>
The style
Now we need to style the loader div, so that it looks like a spinner and let the user know that the component is loading; i.e., the Cubbles RTE is working on getting the component ready. Additionally, we want the observable div to be hidden by default. The style should look as follows:
.loader {
    border: 8px solid #f3f3f3;
    border-radius: 50%;
    border-top: 8px solid #3498db;
    width: 30px;
    height: 30px;
    -webkit-animation: spin 2s linear infinite;
    animation: spin 2s linear infinite;
    display: none;
}

@-webkit-keyframes spin {
0% { -webkit-transform: rotate(0deg); }
100% { -webkit-transform: rotate(360deg); }
}

@keyframes spin {
0% { transform: rotate(0deg); }
100% { transform: rotate(360deg); }
}

#observable{
    display: none;
}
Result
The result of the code above should look as follows:

Check this demo to see the result working online.
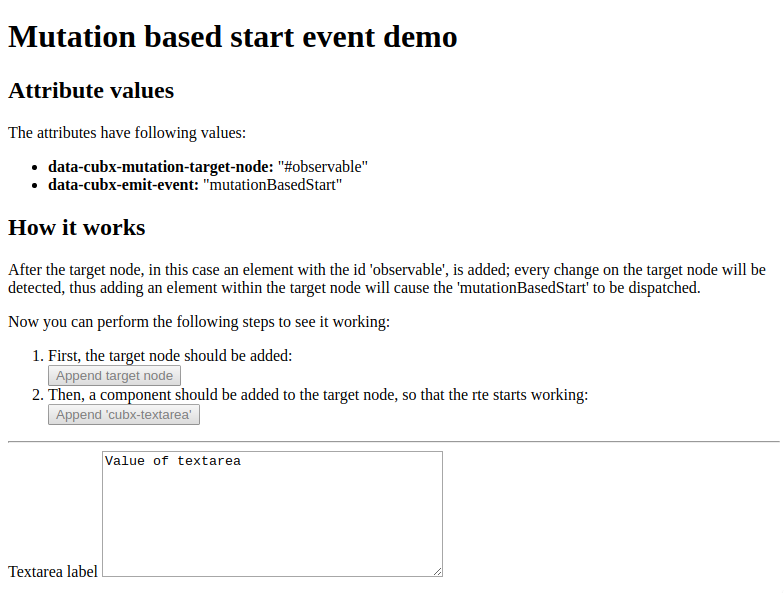
Target node added dynamically
Sometimes you would like to add the target node for the mutation observer dynamically; in that case, the utility mutation-based-cubx-startevent will wait until the node is added to the body to observe it for changes.
The only thing should do is to append a target node that matches the css selector provided in the data-cubx-target-selector attribute.
A working example

Check this demo to see the result working online.
